
Mechanical Design

Pre-Saturator
The pre-saturator is a pressurized vessel which takes dry, compressed air and bubbles it through heated water to saturate the incoming air with water vapour. For the Mark 3, the chamber has been downsized from the Mark 1 and upsized from the Mark 2. The Mark 1 pre-saturator worked on the principle that having a large thermal mass would result in better stability. The Mark 1 had a much larger power consumption and heating time than our current design. The new design consists of two schedule 10 stainless steel pipes, one inside the other to create a fluid jacket, capped on each end.
Air will flow through a check valve into the bottom of the chamber, and out the top. There will be a single 6.5-inch continuous capacitive sensor which will govern when the water is pumped in from an external reservoir. Alternatively, using four level switches was considered an option, however, it was discovered to be difficult to manufacture. A 150W heater will be placed inside the pre-saturator to heat up the volume of water within 30 minutes. The fluid jacket will be heated in parallel with the other two chambers. When the chambers near the setpoint temperature for the calibration chamber, the pre-saturator fluid jacket will be isolated from the other chambers using a solenoid valve and heated an additional 10°C with the 150W heater. Pressure (0-150 psi) and temperature (0 to 95°C) will be sensed through fittings on top of the chamber

Saturator
The saturator is of similar construction to the pre-saturator. The main difference is the length which is twelve inches instead of eight. The saturator’s job is to allow for the air from the pre-saturator to cool down to the setpoint before the expansion valve, maintain 100% RH and condense excess vapour. The Saturator was initially designed to be able to collect all of the condensation if the pre-saturator were to run dry of its initial volume and not have its level reach the sensors halfway up the side. However, this was not the only design parameter that needed to be considered. Mark 2 testing found the saturator was not getting the temperature all the way down to the setpoint. It was within 2-3 degrees of the setpoint which is acceptable considering RH correction factors will make up for this offset.
Mark 3’s saturator will have the same heat diffusion rate as Mark 2 but be twice as long. It will also increase heat exchange by using counter flow. Therefore, the performance should be improved. Calculations on the expected improvement need to be done to find the true rate of heat exchange and optimize the size further. The log mean temperature difference (LMTD) should be used to find this as well as test results on the Mark 2 to confirm the tube and shell method as appropriate for future designs. Alternatively, off of the shelf heat exchangers may be more cost effective and efficient at heat exchange.
Other features of the saturator pictured below in figure 8 include a pressure sensor, temperature sensor, and pressure relief valve. A drain will be routed to an easily accessible location on the perimeter of the frame.
Calibration Chamber
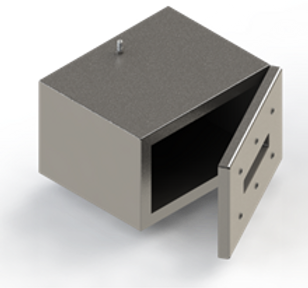
The calibration chamber will be a stable environment where air from the saturator has passed through an expansion valve and reached its final set RH within +/-1%. The chamber is a three-shell design. Two shells are for the fluid jacket around the left, right, top and bottom sides. Insulation occupies the space between the second and third shell on all sides including the chamber door. Testing of the Mark 2 had good stability within +/1-2% and the Mark 3 will have a very similar structure. Notable differences from the Mark 2 are its increased air volume, and the addition of insulation on the front and rear of the chamber. The chamber door includes a look in window larger than previous designs. A piano style hinge allows for a stronger mount than in the Mark 2. Although a thicker gauge of steel was used for the outer calibration chamber shell, additional bracing may be necessary. Overall, the calibration chamber meets requirements for calibrating at least three sensors, looking and feeling like instrumentation and the minimum size.
Mechanical Design
Pre-Saturator
The pre-saturator is a pressurized vessel which takes dry, compressed air and bubbles it through heated water to saturate the incoming air with water vapour. For the Mark 3, the chamber has been downsized from the Mark 1 and upsized from the Mark 2. The Mark 1 pre-saturator worked on the principle that having a large thermal mass would result in better stability. The Mark 1 had a much larger power consumption and heating time than our current design. The new design consists of two schedule 10 stainless steel pipes, one inside the other to create a fluid jacket, capped on each end.
Air will flow through a check valve into the bottom of the chamber, and out the top. There will be a single 6.5-inch continuous capacitive sensor which will govern when the water is pumped in from an external reservoir. Alternatively, using four level switches was considered an option, however, it was discovered to be difficult to manufacture. A 150W heater will be placed inside the pre-saturator to heat up the volume of water within 30 minutes. The fluid jacket will be heated in parallel with the other two chambers. When the chambers near the setpoint temperature for the calibration chamber, the pre-saturator fluid jacket will be isolated from the other chambers using a solenoid valve and heated an additional 10°C with the 150W heater. Pressure (0-150 psi) and temperature (0 to 95°C) will be sensed through fittings on top of the chamber
Saturator
The saturator is of similar construction to the pre-saturator. The main difference is the length which is twelve inches instead of eight. The saturator’s job is to allow for the air from the pre-saturator to cool down to the setpoint before the expansion valve, maintain 100% RH and condense excess vapour. The Saturator was initially designed to be able to collect all of the condensation if the pre-saturator were to run dry of its initial volume and not have its level reach the sensors halfway up the side. However, this was not the only design parameter that needed to be considered. Mark 2 testing found the saturator was not getting the temperature all the way down to the setpoint. It was within 2-3 degrees of the setpoint which is acceptable considering RH correction factors will make up for this offset.
Mark 3’s saturator will have the same heat diffusion rate as Mark 2 but be twice as long. It will also increase heat exchange by using counter flow. Therefore, the performance should be improved. Calculations on the expected improvement need to be done to find the true rate of heat exchange and optimize the size further. The log mean temperature difference (LMTD) should be used to find this as well as test results on the Mark 2 to confirm the tube and shell method as appropriate for future designs. Alternatively, off of the shelf heat exchangers may be more cost effective and efficient at heat exchange.
Other features of the saturator pictured below in figure 8 include a pressure sensor, temperature sensor, and pressure relief valve. A drain will be routed to an easily accessible location on the perimeter of the frame.
Calibration Chamber
The calibration chamber will be a stable environment where air from the saturator has passed through an expansion valve and reached its final set RH within +/-1%. The chamber is a three-shell design. Two shells are for the fluid jacket around the left, right, top and bottom sides. Insulation occupies the space between the second and third shell on all sides including the chamber door. Testing of the Mark 2 had good stability within +/1-2% and the Mark 3 will have a very similar structure. Notable differences from the Mark 2 are its increased air volume, and the addition of insulation on the front and rear of the chamber. The chamber door includes a look in window larger than previous designs. A piano style hinge allows for a stronger mount than in the Mark 2. Although a thicker gauge of steel was used for the outer calibration chamber shell, additional bracing may be necessary. Overall, the calibration chamber meets requirements for calibrating at least three sensors, looking and feeling like instrumentation and the minimum size.